In 2015 Christer and I wanted to make a gift for our good friend Alex.
With Alex being interested in games (he is now a game developer together with Christer. Check out studiogauntlet.com ), we landed on making him a replica of the iconic Mini Nuke from the game Fallout 3. We talked about making it hollow so that it could be used as a box, but because of time constraints we only made an appearance model.
We started out researching a lot for good reference pictures to work from. It is often difficult to find good enough images, so the areas where we could not make out how it looks in the game, we just improvised in somewhat the same language as it was designed in.
Sizing is also often quite difficult with props like this, so we just chose a size that we thought looked good (that was not too far off the one in the game).
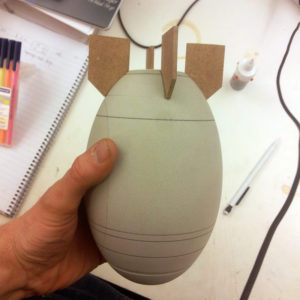
The main body of the prop is made of modelling foam (Ebazell 260) that we turned by hand on a lathe. Constantly checking the profile up against a MDF template we had drawn and cut out.
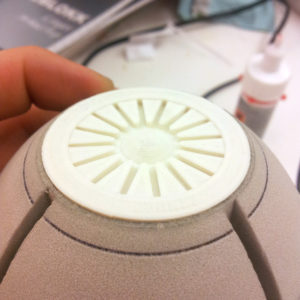
After this we used a Japanese saw and a thin chisel to cut out grooves for the four fins, being very careful with the marking beforehand, so that the grooves would be straight. We also cut out a recess for a propeller piece that we had 3D modelled and printed.
The four fins were made from MDF, and the small connectors that join the fins to the ring was made out of laser cut acrylic.
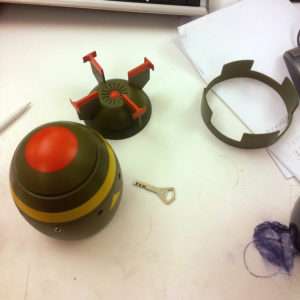
The ring itself was a bit difficult, because we could only find a cardboard tube that had the right diameter, so we started out working with this, but it was not nice. Luckily enough we found a thrown away piece of vacuum formed plastic that at one part of it had the right shape. So, we went for that. This was nice, because it is much easier to get a good finish on plastic than on cardboard. And it is more durable.
We added some screws and some small nails to the body for more realism, and painted the entire thing with spray cans. Montana Gold had some nice colours that we could use.
After assembly and the first layer of paint, I realized that I had placed the screws and the fins incorrectly to each other. Now each fin lined up with a screw, but in the game the fins were placed on an imaginary line in between two screws. This was really annoying, and I was unsure what to do, should I keep it like that, or should I do something about it? Christer was sceptical to doing anything drastically, so I consulted another good friend, and she advised me to follow my gut feeling on this one, because if I just let it be as is, I would regret it. So I took a thin kerf (0.7mm) Japanese saw and cut the thing in two, sanded the surfaces a bit, rotated them to the correct position, and glued them back together.
It was the right choice.
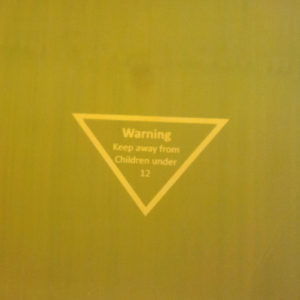
The bomb in the game had two small warning labels saying: “Warning. Keep away from Children under 12”. This was such a nice detail that we had to include it. It is a thing like that that really makes a prop pop.
So with me having experience with screen printing, we figured we should give it a go. Never having printed anything with that high resolution before, and having quite short time until the deadline (birthday party), it would be quite interesting.
I did not know the exposure time for such a thin emulsion layer on such a high-count mesh as we had to use. Not only that, but the emulsion I had was maybe a year over due, so I did not know if it would work at all. But we went for it, and made 10 stencils with different exposure time on each. Out of the ten, three worked. That was good enough for us. It seemed that the exposure time worked for all of them over a certain time, but the biggest problem seemed to be dust and particles in the emulsion that washed out the image in places we did not want.
The printing frame and squeegee was adapted for printing on a convex surface, and the printing went well. It was difficult to leave enough paint with such a thin mesh, and after one fail it worked out well enough. We were going to weather the prop anyway, so as long as it was legible, it was fine.
We had to touch up the black triangle around the print with a paint brush, that did not turn out so well, but it works.
Next was the weathering. We wanted to personalize the gift, and as a cheeky reference to WWII bombs we wrote his name on it so it looked like it was scratched into the surface. This was done with silver paint and different washes of brown and black. We used the same technique to simulate scratches and edge wear on the rest of the prop. Sandpaper was also a good tool for scratching the thing.
We brought this prop to a job interview as prop makers during the UKA 15 festival, and I really think it helped us to get the job.